Thursday, April 9, 2009

More Fun with Leila


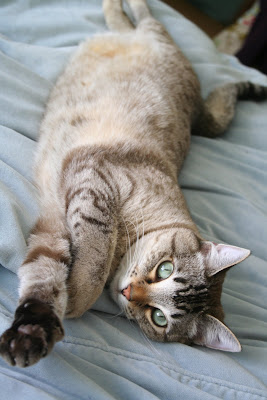
Here we have a collection of fun pictures of Leila taken over the past couple of weeks. She seems to be happiest curled up next to me on the bed while I work on my cross-stitch or blog. At other times she's anxiously waiting to play "toss the feather toy" which she loves to run after. 
Isn't she pretty?

She must know I'm blogging about her, she just woke up and crawled into my lap where she now sits, purring.

I love this one, she reminds me of a model. :)

She's always busy on the computer. 


Leila has found a new favorite hiding place. The other day the appraiser had to come by to inspect and take pictures of the house. For some reason Leila got very scared when she saw her coming up the stairs and immediately ran away. I wasn't sure where she had gone to but, later, when I went into the bedroom, it struck me that the bed looked a little odd: 

See the big lump? That would be Leila. 
She crawled up under the covers and was cowering there in the dark. 

Here's what I saw when I lifted the covers:

Poor scared kitty!

And here's one more. Sleeping with her little friend.

~ElizabethRose

Monday, April 6, 2009

The Making of a Tart Tatin for Woodley

As I was planning my to do list for today I decided to try baking a fun dessert. I knew I would be baking bread all day and I figured I could get some other baking done at the same time. I asked Woodley to pick a dessert he'd like me to make. His answer, "A Tart Tatin!" 

I was introduced to the Tart Tatin through Woodley and his family a couple of years ago. It is a French apple tart somewhat like a pineapple upside down cake. If you are used to apples being featured in desserts alongside spices like cinnamon and nutmeg, you might feel something is lacking. However, the real beauty of the Tart Tatin is its simplicity and its focus on the blending of caramel and apples. If you love caramel apples, this is a dessert for you! 

I found a recipe on Epicurious but since it lacked a pastry recipe, I used one provided in the reviews by "Jenny from Crested Butte, CO" For simplicity's sake I have combined the directions for both below, using the method I used when I baked it today. The original recipe can be found at: "Tart of Les Demoiselles Tatin"

Tart Tatin
8 servings

4 tablespoons butter (plus extra, maybe 2 more tablespoons)
1 cup sugar
8 - 12 granny smith apples
1 rich pastry recipe {see below}
1 egg beaten with a little water or cream

{Here is the pastry recipe I used today. It is quite heavy on the butter - 1 whole cup. This one turned out just fine and was very thick and soft. If you have a favorite pie crust recipe though I think that would work just as well.}

Rich Pastry Recipe:
1 3/4 cup flour 
2 sticks butter (16 tablespoons), divided
1/8 teaspoon salt
1/2 to 3/4 cup water 
1/4 cup powdered sugar

First I made the pastry. 

Mix the flour with 4 tablespoons butter and 1/8th teaspoon salt. I like to whisk the flour and salt together and then add the butter in small chunks. 

I rub the butter/flour mixture between my fingers until the butter is all broken up and the mixture resembles sand or crumbs. (see below)

Next, lightly stir in 1/2 to 3/4 cup cold water just until the dough starts clumping together. Then turn it out and lightly press it into a flat circle. Wrap it up with plastic wrap or wax paper and pop it in the refrigerator for at least 15 minutes. 

While the dough is chilling, start getting the apples ready for the tart. Peel, core, quarter, and slice the apples into thin pieces. 

Every time I peel apples for a pie, tart, or cobbler, I always think of that scene from Sleepless in Seattle when Tom Hanks is on the phone remembering things about his wife, "I'm starting to forget her. She could peel and apple - in one long, curly strip. The whole apple." And there is Meg Ryan, listening and peeling an apple in one long, curly strip. I love that scene. I always try to peel my apples in "one, long, curly strip." I think I've succeeded once or twice, but usually I'm in a hurry and each apple's peel ends up in several pieces. 


Yum! How I do love apples! After growing up in the Pacific Northwest, I've always felt that they were part of my heritage. 

I can't remember exactly how many apples I used, but I think it was between 8 and 10. They weren't super big granny smiths but were more medium sized. After I cut up the amount below, I ended up cutting up 3 more apples to finish filling the pie pan. 


Now we can prepare the caramel. The recipe said to use a heavy pie tin and to cook 4 tablespoons of the butter and 1/2 cup of the sugar together in the pie pan. I didn't have a heavy metal pie pan so I decided to cook up the caramel in a saucepan and then transfer it to my pie pan. 

The next time I make it I think I'll use my cast iron skillet which will be a more traditional way to make the tart because I can create the caramel sauce in the pan, add the apples, and then transfer it directly to the oven for baking. 

So, find a heavy metal pie pan, cast iron skillet (about the size of a pie pan), or a sauce pan and melt 4 tablespoons butter and 1/2 cup sugar over medium heat. 

Cook until the mixture is thick, syrupy, and lightly browned (see below). 

Here is where I transferred my caramel sauce to my glass pie pan. If I had used my cast iron skillet or a metal pie tin, I would have left the sauce in the skillet/pan and added the apples directly to that. I think I could have let the caramel cook a little longer to develop more of that burnt sugar taste, but it turned out great this way too. 

Now would be a good time to start pre-heating the oven to 450 degrees F. 

Next, arrange the apple slices on top of the butter and sugar mixture. Dot each layer with butter and sprinkle with a little bit of sugar from the second 1/2 cup left over. 

I like to do them in circles so that they lay nicely in the finished tart. Pay special attention to the bottom layer since that is the one that will end up on top when the tart is flipped upside down after it is done cooking. 

Build the apple slices up in the center to come above the rim of the pan. 

Apples seriously reduce in size when they cook so I like to add as many of them as I can reasonably fit in the pan. Below is my tower of apple slices! I added more dots of butter and a  sprinkle of sugar between each layer. 


The tart is almost finished, we just need to finish putting together the pastry crust. 

From the pastry recipe, combine the remaining 12 tablespoons of butter (1.5 sticks) with 1/4 cup powdered sugar.

Take the dough out of the refrigerator and roll it out until it is quite thin. Spread the butter/powdered sugar mixture in the center of the dough. 


Then, fold the dough over the butter/sugar mixture to form a square package. 

Now roll the dough out again until it is thin. Next, repeat the last two steps by folding the dough over into a square packet and rolling it out again. If it is too soft with the butter, stick it in the freezer for about 15 minutes and it should be easier to roll out. This process forms layers of butter in the dough that will help make it flaky when it cooks. 

Below is a picture of the dough package after I started rolling it out. The rolling pin I used is actually a muddler that I bought for making mojitos last summer. :) It works great as a rolling pin though because it is small and lightweight which gives me a lot of control. I also have a big marble rolling pin, but for some pastries it is too heavy. 

When the dough has been folded up and rolled out twice (the final dough should be rolled to 1/8th inch thick and be big enough to cover the tart), fold it up into a compact package so it will be easy to move over on top of the apples. I like to do this by folding it in half then folding that half in half and repeating the process until it is the shape of a piece of pie (see below). Folded this way, it is easy to move and easy to unfold - just set the pointy end at the center of the tart and start unfolding. 

I trimmed off the excess dough about an inch beyond the edge of the pie pan and folded the overhang under to make a bit of a seal. 

Brush with a bit of egg beaten with a small amount of water. 

Bake at 450 degrees F for 10 minutes. Be sure to put an extra pan below the tart to catch the drips. My tart dripped a ton in the oven! 

Reduce heat to 375 degrees F and continue cooking until the apples are soft and the crust cooked through. I ended up baking my tart about 50 minutes. It looked great when it came out of the oven!

Let the tart cool slightly and then carefully invert it onto a serving plate. The apples should have caramelized with the sugar-butter mixture making a delicate brown top for the tart.

I had to slide a knife up around the edge of the pie pan to get the tart out, but once the pastry was detached from the edge it came out easily. 

My apples didn't caramelize too much but it still tasted wonderful! We ate it with vanilla ice cream for dessert and it was even better for breakfast the next day. 

I don't think it's going to last too long! 

~ElizabethRose

Fabulous and Easy Potato, Chicken, and Fresh Pea Salad

A couple days ago, I picked up a copy of the April edition of Cooking Light at the grocery store. I used to read Cooking Light a lot when I was in high school but I stopped subscribing when I went to college and never really got back into it. As I flipped through the pages, I immediately felt at home and began to remember just why I liked it so much in the first place. I love their collections of fairly simple, healthy recipes that feature fresh produce. This month's magazine even has a section of recipes featuring goat cheese, which is one of my favorite things! I think I might have to renew my subscription!

One of the recipes that caught my eye was the "Potato, Chicken, and Fresh Pea Salad." I have been feeling like making a potato salad for for a week or so now, but the idea of all that mayonnaise had kept me from starting. This recipe seemed like a great solution. I made it for lunch today and it was everything I'd hoped for and more!

It features rotisserie chicken which was all ready and waiting for me at the grocery store and a tarragon, lemon, dijon mustard vinaigrette which is the perfect finishing touch. Woodley and his friend Steven (who were working from our house today) both loved it and even had seconds!

Potato, Chicken, and Fresh Pea Salad
From Cooking Light, April 2009, page 92

1 pound fingerling potatoes, cut crosswise into 1-inch pieces
2 cups fresh sugar snap peas
2 cups chopped skinless, boneless rotisserie chicken breast {I used leg meat in addition to the breast meat}
1/2 cup finely chopped red bell pepper
1/2 cup finely chopped red onion {I used about half this since we don't really care for red onion}
2 tablespoons extra-virgin olive oil
2 tablespoons white wine vinegar
1 tablespoon fresh lemon juice
1 tablespoon Dijon mustard
1 teaspoon minced fresh tarragon 
1 teaspoon salt 
1/2 teaspoon freshly ground black pepper
1 garlic clove, minced 

{I was happy to find fingerling potatoes at the grocery store. In the past, I haven't been able to find them, but I think little red skinned onions would work just as well.}

{The potatoes had a fun coloring on the inside. I thought they kind of looked like little people running around in the potatoes.}

1. Place the potatoes in a large saucepan; cover with cold water. Bring to a boil. Reduce heat and simmer 10 minutes or until almost tender. Add peas; cook 2 minutes or until peas are crisp-tender. Drain; place vegetables in a large bowl. 

{I completely forgot to add the peas before draining the potatoes. Oops! When I realized my mistake, I filled up another pan with hot water and quickly heated it to a boil and cooked the peas separately. It worked just fine. Since I wanted to have a cold salad for lunch (it was really hot in the kitchen because I was baking bread), I ran the potatoes and peas under cold water to chill them before adding them to the other vegetables.}

Add the chicken, bell pepper, and onion. 

{Yum! Rotisserie chicken! If I had had left over chicken from making stock I would have used that, but this was a very easy way to go and was only about $3 more expensive than buying an uncooked chicken}

2. Combine oil and remaining ingredients, stirring with a whisk. 

Drizzle over salad; toss gently to combine. Yield: 4 servings (serving size: about 1 1/2 cups)


{Yum! The combination of sugar snap peas, potatoes, and chicken is a great one. It is filling enough to be a main course but is light enough for a hot spring/summer day and only takes about an hour or so to put together. The dressing is divine! I will definitely be making this one again! Probably all spring and summer, every spring summer from now on!} 

~ElizabethRose

Sunday, April 5, 2009

A Shade Garden

Above, our new shade garden! We still need to finish planting some of the plants, but it looks so much happier than it did before! 

For several months now we have had a bare patch of garden space right in front of our house. Our landlords had talked of putting in oleander, but we decided we wanted to do something a little more elaborate. We talked about what it should be off and on all winter but finally, yesterday, we actually took action. 

At first, my plan was to plant a variety of rose bushes. However, after thinking about it a bit I realized that the front side of our house gets almost no sun - just a little in the morning and nothing after that. So it seemed like roses wouldn't be a very good option.

At the nursery last week we started investigating plants that do well in the shade. We finally decided upon camellias because they do particularly well in this climate and will flower longer than rhododendrons or azaleas. Interestingly, it turns out that the land we live on used to be a commercial camellia farm. I hope that bodes well for our new camellias. :) 

We got 3 camellia plants, 2 bags of high acid camellia/azalea potting soil, a box of camellia/azalea organic fertilizer, and some other shade loving plants to fill in the space between the camellias. 

We started by digging a hole as close to 3 times the diameter of the pot the camellias came is as we could get. The soil had lots of clay and rocks so we were really glad we had the potting soil to mix in as well as the fertilizer. We put some of the mixture in the hole before transplanting each camellia. 

Then we filled in the hole with more soil/potting soil/fertilizer mix and made a little wall of soil a little ways away from the base of the plant. We filled in the little "moat" with water and let it drain 3 times (following the directions we got at the nursery). 

We think they turned out pretty well! (It's now been over 24 hours and they still look happy.) 

It took us a couple of hours to get all 3 planted and we haven't yet planted the other shade-loving plants we got to go with them. Maybe we'll get to that later this week. 

Here's a picture of the other type of camellia we got. I'll look up the names later this week. We got 2 of the one below and put them on either side of the type whose picture appears above.

We also got 2 of these forget-me-not type flowers to go in-between the camellias as well as 6 small creeping plants with white flowers. We hope they will form a sort of ground cover around the front of the bed. 

Yay gardening! 

~ElizabethRose

Saturday, April 4, 2009

A Kaleidoscope of Chorus Girls

A few nights ago, Woodley and I were planning to watch a movie together. However, somehow Busby Berkeley came up in conversation and we spent the rest of the evening watching clips on YouTube featuring his choreographies. 

If you haven't heard of Busby Berkeley before, don't feel too left out. I didn't find out about his creative genius until I started going to classic movies at The Stanford Theater with Woodley a few years ago. He is best known for choreographing elaborate dance numbers for movie musicals of the 1930's involving huge numbers of chorus girls, odd camera angles, and kaleidoscopic effects. His dancers move with amazing precision and timing and boy are there a lot of them! 

One of our favorites is called "By a Waterfall" from Footlight Parade, 1933. If you have some time (and enjoy synchronized swimmers, chorus girls, or kaliedscopes), check it out on YouTube (see below) the entire sequence is about 10 minutes and the really crazy stuff starts about 3 minutes into the clip.


Here's a brief biography of Busby Berkeley's life: Berkeley was born in 1895 in Los Angeles, CA to a theatrical family. He grew up performing on stage with his family but had to leave the theater when he joined the military during WWI. As a lieutenant in the artillery, in addition to firing ammunition, he learned to command a large number of people. Near the end of his military career, he was "ordered to stage camp shows for soldiers." (IMDB.com) When he returned to the states he began choreographing dance numbers for stage productions but eventually made his way back to Hollywood and began working on movies. Interestingly, he never had a dance lesson. 

As the title of this one comments, a good solution for the economic crises: "We're in the Money" from The Golddiggers of 1933, featuring Ginger Rogers:


Here's another interesting number featuring a bunch of chorus girls dressed as cats. This one is also from Footlight Parade.   


And just one more. :) "Pettin' in the Park" from Golddiggers of 1933. I wonder what exactly they meant by "pettin'" back in 1933. 


If you like those, check out other musical movies by Warner Brothers from the 1930's featuring Berkeley's choreography such as:  42nd Street, Dames, Gold Diggers of 1935, and The Gang's All Here. You can probably find them at your local movie rental store or on Netflix.com 

Friday, April 3, 2009

A Celebration with Ranunculus and Kitties

Just a few minutes ago we got an email from our real estate agent letting us know that our offer on the house was accepted! Yay! We are so thrilled and are looking forward to getting all of the contingency investigations finished up so we can complete the sale!

To celebrate, I thought I would post some more beautiful photos of ranunculus flowers. I took these photos this afternoon and they feature some flowers I got at the market today (they were on sale!) There are a lot of them because I just can't resist ranunculus and I can't pick my favorite photos of them!

Leila was very curious about the flowers. 


~ElizabethRose