 In my attempt to learn how to garden, I recently bought about 4 books to use as resources as I start out. One of them, "All New Square Foot Gardening" by Mel Bartholomew was highly reviewed on Amazon and seemed to have the easiest system of the books I currently have. Mr. Bartholomew is annoyingly self-absorbed and condescending throughout the text (for example, do we really need a blow by blow recounting of every television program, newspaper, magazine, or radio program that ever asked him to come speak for them?), but his system seemed pretty straightforward and easy to get started so we decided to try it.
 For a "Square Foot Garden" you create 6 inch high planter boxes and fill them with "Mel's Mix" (a combination of compost, peat moss, and vermiculite). You then create a grid of 1x1 foot squares over the box and create a cover to protect your plants from predators. He claims that only 6 inches of soil is needed to grow most vegetables (you have to make a special, taller, box for carrots, parsnips, and potatoes). Since it's a fairly small space, you fill the boxes entirely with his special mix and don't use any of your existing soil which, theoretically, allows for a perfect mix of soil and no pre-existing seeds/weeds.
Once you have created your boxes and divided them into 1x1 foot squares you can then start planting them - filling each box with a specific number of plants, depending on the space they need to grow.
I spent some time flipping through the book and made a list of what we would need to build 3 four by four foot boxes, that would allow us 48 one foot squares in which to grow our veggies. Soon we were on our way to several gardening stores and eventually Home Depot to pick up supplies (that was Saturday afternoon).
We picked up some compost and seed packets at the nurseries and got the lumber and hardware we needed at Home Depot. The car was quite packed by the end of our trip!
 When we got home, we laid out the lumber and Woodley started screwing the boards for the boxes together with his power drill.
 Once he finished with the outer edges of the box, we used a staple gun to tack down a weed barrier cloth over the bottom of the box. That would protect us from new weeds growing up and contaminating our "perfect" mix of soil.
 Here's the finished box covered with the weed barrier.
 Next, we applied some chicken wire to the bottom of the box, also with the staple gun. Hopefully the chicken wire will protect our delicious veggies from the ravenous ground squirrels that live around here. (We believe one of our previous gardens fell prey to the ground squirrels - each day we would go out to find another plant completely gone! It was like they had a vaporizer gun and could just make the plants completely disappear! I would be very sad if that happened to our garden!)
 After we finished stapling the chicken wire down, I cut off the extra with special metal cutting pliers.
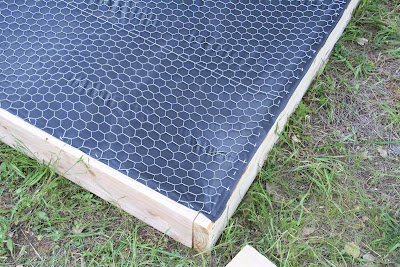 Our first finished box!
 They looked quite nice standing up against the fence. It took us a few hours to finish with all of the boxes and we were quite happy with them when they were done.
 Here is the area we decided to use for our garden. It gets a fair amount of sunshine and there is a good water source for the hose on each end of the field. Also, it's about a 60 second walk from the house and is on the way to the mailbox, so I should go by it every day. Oh! And it is protected from deer by a very tall fence. The trellises are remnants of a bygone era.
 This morning I decided to put together "Mel's Mix" using the ingredients we had picked up on Saturday. Altogether we used: 8 cubic feet of peat moss, 8 cubic feet of vermiculite, and 8 cubic feet of compost (and 1 cubic foot of worm castings). Mr. Bartholomew recommended using a variety of at least 5 different composts. Attempting to follow his directions as closely as possible, we used 3 cubic feet of "Organic Earth Compost," 1 cubic foot of chicken manure, 1 cubic foot of "Steer Manure Blend," 3 cubic feet of Gardner and Bloome's "Soil Building Compost" (made of: "forest humus, chicken manure, worm castings, bat guano, kelp meal, oyster shell lime, and dolmite limes, plus mycorrhizae" - where in the world do they get organic bat guano??), and 1 cubic foot of "Worm-Grow Earthworm Castings." Hopefully it will make a good mix.
 Apparently, some reviewers on Amazon had a hard time finding Vermiculite. At our local Orchard Supply Hardware Store (OSH) they had a small bag that wasn't even 1 cubic foot. Since we needed 8 cubic feet altogether, we kept looking. We found these big 3.7 cubic feet bags at Home Depot. I couldn't tell if it was coarse or medium grade (Mr. Bartholomew recommends coarse grade). Since it was the only Vermiculite to be had easily we went ahead and got it. I think it looks pretty much like the pictures in the book.
 I got a big tarp out and started pouring the different ingredients on.
 I tried to mix it a bit after each new addition using a handy spade I found in the garden. Here's a picture after I added the first bag of vermiculite.
 It took me about and hour to an hour and a half to finish mixing all of the compost, peat moss, and vermiculite together. Here's how it looked when I was finished.
 You can see all of the pieces of vermiculite mixed in with the soil.
 While I had been busy mixing up the soil, Woodley had been busy cutting the grass and getting the boxes set up in their final resting places.
 The next step was to shovel in the soil.
 It was pretty fun to see the boxes filling up!
 Two finished boxes, complete with "Mel's Mix."
 Later in the afternoon, I came back down to the garden and put together some strips of plastic over one of the boxes to outline the square feet in each box (16 per box). Apparently that is very important for "Square Foot Gardening." Unfortunately, I ran out of tape after one box.
 Next, I decided to make the protective cover for the box. Woodley had put together the bottom of the cover using small 2x1 inch pieces of wood and deck screws. Sadly, his squares of wood didn't stay together very well so I only ended up doing one of the 3 tops. Using the wooden 4 foot x 4 foot square as a guide, I cut pieces of chicken wire that extended roughly 32 inches beyond the edges of the box. I then folded the sides up and attached the edges using zip ties. Creating the cover (I'll do the other two later this week) was the hardest part of the entire process. The chicken wire was incredibly sharp and although I was wearing gloves to protect my hands, they didn't prevent it from flinging back and scratching my arm. I got several deep cuts :(
 I connected the bottom of the chicken wire box to the wooden frame supports using the staple gun.

 When we got home, we laid out the lumber and Woodley started screwing the boards for the boxes together with his power drill.
 Once he finished with the outer edges of the box, we used a staple gun to tack down a weed barrier cloth over the bottom of the box. That would protect us from new weeds growing up and contaminating our "perfect" mix of soil.
  Here's the finished box covered with the weed barrier.
  Next, we applied some chicken wire to the bottom of the box, also with the staple gun. Hopefully the chicken wire will protect our delicious veggies from the ravenous ground squirrels that live around here. (We believe one of our previous gardens fell prey to the ground squirrels - each day we would go out to find another plant completely gone! It was like they had a vaporizer gun and could just make the plants completely disappear! I would be very sad if that happened to our garden!)
 After we finished stapling the chicken wire down, I cut off the extra with special metal cutting pliers.
  Our first finished box!
  They looked quite nice standing up against the fence. It took us a few hours to finish with all of the boxes and we were quite happy with them when they were done.
  Here is the area we decided to use for our garden. It gets a fair amount of sunshine and there is a good water source for the hose on each end of the field. Also, it's about a 60 second walk from the house and is on the way to the mailbox, so I should go by it every day. Oh! And it is protected from deer by a very tall fence. The trellises are remnants of a bygone era.
  This morning I decided to put together "Mel's Mix" using the ingredients we had picked up on Saturday. Altogether we used: 8 cubic feet of peat moss, 8 cubic feet of vermiculite, and 8 cubic feet of compost (and 1 cubic foot of worm castings). Mr. Bartholomew recommended using a variety of at least 5 different composts. Attempting to follow his directions as closely as possible, we used 3 cubic feet of "Organic Earth Compost," 1 cubic foot of chicken manure, 1 cubic foot of "Steer Manure Blend," 3 cubic feet of Gardner and Bloome's "Soil Building Compost" (made of: "forest humus, chicken manure, worm castings, bat guano, kelp meal, oyster shell lime, and dolmite limes, plus mycorrhizae" - where in the world do they get organic bat guano??), and 1 cubic foot of "Worm-Grow Earthworm Castings." Hopefully it will make a good mix.
  Apparently, some reviewers on Amazon had a hard time finding Vermiculite. At our local Orchard Supply Hardware Store (OSH) they had a small bag that wasn't even 1 cubic foot. Since we needed 8 cubic feet altogether, we kept looking. We found these big 3.7 cubic feet bags at Home Depot. I couldn't tell if it was coarse or medium grade (Mr. Bartholomew recommends coarse grade). Since it was the only Vermiculite to be had easily we went ahead and got it. I think it looks pretty much like the pictures in the book.
  I got a big tarp out and started pouring the different ingredients on.
  I tried to mix it a bit after each new addition using a handy spade I found in the garden. Here's a picture after I added the first bag of vermiculite.
  It took me about and hour to an hour and a half to finish mixing all of the compost, peat moss, and vermiculite together. Here's how it looked when I was finished.
  You can see all of the pieces of vermiculite mixed in with the soil.
 While I had been busy mixing up the soil, Woodley had been busy cutting the grass and getting the boxes set up in their final resting places.
  The next step was to shovel in the soil.
  It was pretty fun to see the boxes filling up!
  Two finished boxes, complete with "Mel's Mix."
 Later in the afternoon, I came back down to the garden and put together some strips of plastic over one of the boxes to outline the square feet in each box (16 per box). Apparently that is very important for "Square Foot Gardening." Unfortunately, I ran out of tape after one box.
  Next, I decided to make the protective cover for the box. Woodley had put together the bottom of the cover using small 2x1 inch pieces of wood and deck screws. Sadly, his squares of wood didn't stay together very well so I only ended up doing one of the 3 tops. Using the wooden 4 foot x 4 foot square as a guide, I cut pieces of chicken wire that extended roughly 32 inches beyond the edges of the box. I then folded the sides up and attached the edges using zip ties. Creating the cover (I'll do the other two later this week) was the hardest part of the entire process. The chicken wire was incredibly sharp and although I was wearing gloves to protect my hands, they didn't prevent it from flinging back and scratching my arm. I got several deep cuts :(
 However, once I had finished wrestling with the chicken wire and actually got it cut out, bent into shape, and zip tied together, it seemed to work better than I had expected.
 I connected the bottom of the chicken wire box to the wooden frame supports using the staple gun.
So I now have 1 fully completed box with cover and 2 completed boxes that still need their square foot markers and chicken wire tops. I hope to finish those and start planting by the end of the week! Updates are to come!
~ElizabethRose


