Wednesday, March 25, 2009

Sheep Attack!

This morning, Woodley and I decided to go for a little walk before he had to leave for work. I had a bill that I needed to drop off at the mailbox so we decided to do a little circle of a walk that leads us back around by the mailbox and driveway. 

At the beginning of the walk we go down a little trail across our landlord's property. They have 2 sheep that they got to help "mow" the grass on the steep hillside. This morning when we went through the gate we heard a loud "Baa" and looked up. There, towering above us on the terraced hillside was one of the sheep. We did our best "Baa" back at it, by way of being social. It continued the conversation and then began bounding down the hill towards us - stopping every few feet to let out another startlingly loud "Baa." I was a bit worried it might be planning to run us down and the prospect of being trampled to death by one sheep did cross my mind as it came hurtling down the hillside. However, it narrowly missed us at the bottom and, instead, came to a stop and looked us up and down inquisitively. It sniffed at our hands and tried to eat my skirt. It was very cute and fluffy and I got over my scare very quickly. My only regret was that I didn't have my camera with me. Oh well, I'll have to try again next time. 

The sheep was very sociable and didn't seem to want us to leave. It actually gave me a little nudge with its head when I turned around to head down the trail. As we continued our walk, it followed us all the way to the next gate and "baaed" after us when we went through. I felt a little like Mary (the one with the little lamb from the nursery rhyme). 

Now it is Wednesday, and I have decided that Wednesday will be "Special Project Day" a day to tackle projects that take quite a bit of time. For today, I plan to clean (or start to clean) "the blue room." It isn't actually blue at the moment, but it was when we first saw the house, so we continue to call it "the blue room." The plan is for it to be my sewing and crafting room. However, as you can see from the picture below, I have my work cut out for me. 

I'll work on it today and will post updates as I make progress.

And now, I really ought to get started on that! 

~ElizabethRose

Tuesday: A Productive Day!

I am so proud that yesterday was so productive! I had my camera with me and took pictures throughout the day so I could share my many activities. 

First, I woke up, had breakfast with Woodley and packed up a lunch for him. Then I set about my Tuesday tasks. I've decided that Tuesday will be cleaning day so I grabbed my cleaning rags and set about it. I cleaned the bathroom then vacuumed, dusted, and tidied up the living room, dining room, bedroom, hallway, kitchen, and office. Poor Leila was quite frightened by all the noise and hid in the bedroom or office most of the day - trying to keep out of the way of the vacuum. It took me a few hours to finish with all that.

As I was cleaning various surfaces, it struck me that I really ought to polish the silver. We don't have very much and all of the pieces that we have were presents given to us in the last year (most were wedding presents). I don't think we had any silver in the house when I was growing up so I really don't remember ever polishing silver before. A couple of months ago I bought a little box of silver polish from Bed, Bath, and Beyond. It has been sitting up in the cupboard for months and it felt really good to finally get it out and use it yesterday. Inside the box was a round container of polishing "stuff." It was blue and had a little sponge included with it. I wet the sponge, dipped it in the blue polishing "stuff," and set about rubbing down the silver pieces. 

It was pretty fun to see the dark tarnish coming off and the beautiful shiny silver appearing once again. Below are some before and after pictures. 

Before:
This is a spoon my Aunt Elizabeth gave me. Isn't it lovely! I believe it once belonged to her mother. I absolutely adore it because it has my name (well, a variation of it) engraved in the spoon and it is surrounded by roses (my favorite flower and also my middle name). I had been feeling so badly for it for months as I watched it get blacker and blacker. It was so exciting to finally see it again in its fully polished glory! 

After:
So lovely! One of the other things I polished was the dresser set my mother gave me for Christmas. Below is the brush. It definitely looks much nicer after the polish. 

Before:
After:

Next, I decided to work on my counted cross-stitch project. My good friend Zaz is an amazing cross-stitcher and has been doing it for years. I've been hoping to pick it up again (I used to cross-stitch a little as a girl) and have talked to Zaz about it several times over the last few years. Last Thursday, we got together at her house and had a fun evening of crafting, eating, and watching girly TV shows. It was fabulous! She is helping me get started and gave me some of her old supplies that she didn't need anymore. My "homework" for this week was to get the embroidery threads required for one of the patterns I wanted to do (Zaz let me look through her huge collection of cross-stitch books and I picked out some I liked). I accomplished that task last weekend and have been trying to get started ever since then. 

I decided to do a simple "Little Bo Peep" themed one. Following Zaz's guidance, I made a copy of the design and use a highlighter to mark off the squares I have stitched. 

Here's what I got done yesterday. It doesn't look like much yet, but I think it will be very cute when it's done! 

The cross-stitching was so much fun that before I knew it, it was time to get dinner ready. I had decided to make Carrot Top Soup from "Local Flavors: Cooking and Eating from America's Farmers' Markets," a fabulous cookbook that was given to me at one of my bridal showers. I have never cooked with carrot tops before so I was very excited to try it. Appropriately, the carrots and their tops were from our local farmer's market. 

Carrot Top Soup
From "Local Flavors" by Deborah Madison

1 bunch (6 small to medium) carrots, their tops and the roots 
2 tablespoons unsalted butter
3 tablespoons white rice
2 large leeks, white parts only 
2 thyme or lemon thyme sprigs
2 tablespoons chopped dill, parsley, celery leaves, or lovage 
sea salt and freshly ground pepper
6 cups vegetable stock, light chicken broth, or water

1. Pull or pluck the lacy leaves of the carrot greens off their stems. You should have between 2 and 3 cups, loosely packed. Wash, then chop finely.

{I decided to wash the tops before pulling the leaves off because they were very sandy. I rinsed them several times in a bowl of water and then let them sit while I chopped up the carrots. There was quite a bit of dirt and sand that came off of them but in the end they were very clean.}

Wash, then grate the carrots or, if you wish a more refined-looking soup, finely chop them. 

{Since I had some extra time, wanted to practice chopping, and thought a "more refined-looking soup" sounded nice, I decided to chop the carrots. It did take awhile (grating definitely would have been much faster) but I liked the way they came out in the end.}

{Here's the chopped up carrot tops.}

2. Melt the butter in a soup pot. 

Add the carrot tops and carrots, rice, leeks, thyme, and dill. Cook for several minutes, turning everything a few times, then season with 1 1/2 teaspoons salt and add the stock.

Bring to a boil and simmer until the rice is cooked, 16 to 18 minutes. 

3. Taste for salt, season with pepper, and serve. 

The soup came out quite tasty. It was very light and I think next time I would add some pieces of chicken to make it a bit heartier. I would definitely make it again though. Oh! I also used some of the chicken stock I made last week! It was very exciting to start using it. 

To go along with the soup I cooked up some broccolini, baked a small piece of hake (white fish) that I got on sale the other day, warmed up some of the bread I had baked on Monday, sliced up an apple and orange, and made a green salad. 

Altogether, it made for a very delicious meal! 

After dinner, we watched Designing Woman (1957) directed by Vincent Minnelli starring Gregory Peck and Lauren Bacall. With the star studded cast and Minnelli directing, I expected great things. Sadly, I wasn't too impressed. The plot was somewhat interesting and there was a happy ending but there were also some very weird parts. Like when this quirky choreographer starts knocking out the bad guys with his weird dance moves. At that point, it was a bit like a kung fu movie but with modern dancers instead of martial artists. 

Here's a trailer for it, in case you want to see a bit of what it's like: 


I also didn't like Lauren Bacall in it very much. Her character in it was so different from other roles I have seen her in. For example, I absolutely love her performance in To Have and Have Not. After last night, I decided that I like her best in black and white. I would definitely recommend To have and Have Not, it's a bit more serious but I liked it a lot (Woodley didn't care for it too much though). Here's a sample: 


~ElizabethRose


Tuesday, March 24, 2009

The Mother Orange Tree, Oroville, California

Last Saturday, Woodley and I had the opportunity to drive up to Oroville, California to visit my Aunt Barbara, my cousin Kattyln, and Kattyln's son Jacob who were visiting from Oklahoma. Aunt Barbara's mother lives in Oroville so they come out from time to time to visit. This was the first time Woodley and I had been up that far north in the central valley. Before we left, we read up on Oroville and discovered that it has three very interesting attractions. 

The first is the Feather River. Kattlyn and Aunt Barbara had gone kayaking along the river the day before our visit and they had hoped to take us with them for another kayaking trip. We were very excited about that possibility. However, a combination of rain, wind, and timing disrupted that plan. We did get to see the river on our way out of town though. 

The second interesting attraction is the Oroville Dam. According to Wikipedia it is "one of the 20 largest dams in the world, the largest earth filled dam in the US, as well as the tallest dam in the US. Kattlyn's grandfather told us how he had worked on the dam after high school. 

The third, and in our opinion, most interesting attraction of Oroville is "The Mother Orange Tree." What exactly is a "Mother Orange Tree?" you may be wondering (as I was wondering when I first read about it). Apparently it is the oldest of all northern Californian orange trees. As the story goes, it was brought to California on a shipping vessel from Mazatlan, Mexico. It came around Cape Horn and up to Sacramento, CA where it was purchased by Judge Joseph Lewis in 1856. He then planted it next to the Bidwell Bar Bridge in Oroville. At that time, Oroville was a popular place for miners (Bidwell Bar being one of the first gold mining sites in California) and the miners would savor the flourishing orange tree's fruit and save the seeds to plant later. The Mother Orange Tree, which was a novelty when it first arrived in northern California, proved that citrus trees actually could thrive in the northern California climate and thus started the fabulous northern California orange industry. 

The Mother Orange Tree has been transplanted twice in its illustrious history and now resides next to the California State Park Headquarters in Oroville. We read on Wikipedia that the tree had grown to a height of over 60 feet tall. I don't know about you, but we had never seen an orange tree taller than maybe 15 feet so we were very excited about the prospect of seeing a 60 foot tall tree. 

After a fabulous lunch made for us by Kattlyn's grandfather (delicious ribs, baked beans, potatoes, coleslaw, bread, a green salad, and iced tea!), we headed out with Aunt Barbara, Kattlyn, and little 1 year old Jacob to find this Mother Orange Tree.

After a bit of wandering we finally stumbled upon the Park Headquarters. I had expected some grand entryway with the the stately, huge, orange tree at the top of a set of stairs or at least surrounded by a pavilion. I was therefore surprised to see the tree off to the side of the parking lot surrounded by a small fence. If you didn't know to look for it, it would be a very easy thing to pass by completely. Up the hill from the tree there was a plaque to commemorate its grand history: 

However, even more unexpected, was the size of the tree. Perhaps it was once 60 feet tall or perhaps Wikipedia was completely mistaken, but the tree is now around 16 feet. Bigger than most orange trees I've seen, but definitely a far cry from 60 feet! Here it is:

It was, however, producing beautiful orange fruit and it still was the oldest orange tree in California so we were very excited to see it anyways. Since there weren't any signs prohibiting us from picking the fruit, Woodley used his long arms to great advantage and plucked us two oranges.

We ate them later that afternoon and they were absolutely delicious! It was very fun to think we were sampling oranges so similar to the ones the miners ate as they searched for gold along the river over 150 years ago. 

One other interesting fact about The Mother Orange Tree is that it was struck by a sever frost in 1998 resulting in a decay fungus that hollowed out part of the trunk and caused the tree to stop bearing fruit for a few years. This worried everyone so, in order to preserve the precious Mother Orange, scientists at The University of California, Riverside cloned The Mother Orange Tree in 2003. So now there are a couple of copies of the tree sprinkled throughout Oroville. 

After seeing the tree, we headed over to check out the dam. We were able to drive all along it and it was very tall. There was a beautiful view from the top. After that we just had time to drop by the visitor center before they closed for the day. From there we got some good pictures, including this one of the dam: 

The walk to the visitors center. Such an interesting variety of flora exists in that area. I thought it was beautiful! 

Here's a picture of the lake created by the dam. The red dirt is very beautiful against the blue water and the green trees. 

Inside the visitor center there was a fun diorama of wildlife and some scenes of the Native American population who used to live in that are. I would definitely recommend a visit to the center if you ever happen to be in Oroville. 

It was so much fun visiting with Aunt Barbara and cousin Kattlyn, and getting to meet Jacob for the first time in person was wonderful. He is such a jolly little boy who is so full of energy. We are hoping to get out to Oklahoma to visit them again this coming Christmas!

~ElizabethRose

Monday, March 23, 2009

A Day of Baking... And Nothing Else

Well, looking back to my previous post, I think I may have been a bit too ambitious when I wrote out my to-do list for today. Of all the things I hoped to do, the only I actually accomplished were baking 4 loaves of bread and practicing counted cross-stitch. The breads I made were the Whole Wheat Learning Loaf and Buttermilk Bread from "The Laurel's Kitchen Bread Book: A Guide to Whole-Grain Breadmaking" by Laurel Robertson(2 loaves each). While I was at it, I decided to go ahead and try the Cinnamon Roll recipe as well, using the Featherpuff Bread. I started baking this morning around 9am and finished up with the last cinnamon roll around 10:30pm. It was a long day but it was definitely worth it. 

Below are some pictures from my cinnamon roll making experience along with a little bit of description and the recipe (taken from "Laurel's Kitchen Bread Book.") My notes are in the {}

Don't worry, the cinnamon rolls didn't actually take 11 1/2 hours, I didn't start them until part way through the afternoon when the other loaves were well underway. 


Featherpuff Bread {for Cinnamon Rolls}

1 1/2 cups cottage cheese
2 eggs, slightly beaten
1/4 cup honey
1/2 cup water

2 teaspoons active dry yeast 
1/2 cup warm water

5 cups whole wheat flour, finely ground
1/2 cup powdered milk
1 1/2 teaspoons salt 

2 tablespoons butter, in cold chips

Warm the cottage cheese gently in a saucepan. {I had never thought of putting cottage cheese into bread before! What an interesting idea. I was curious to see how it would come out. Would there be chunks of cottage cheese in the final loaf?}

{As I waited for the cottage cheese to warm up, I got the eggs, water, and honey mixture ready to go.}


{Later in the recipe, it mentioned that the final temperature of the cottage cheese, honey, water, and egg mixture - after they had all been combined - should be 80 degrees F. Armed with that knowledge, I decided to heat the cottage cheese to around 100 degrees F. I used my candy thermometer to keep track of the temperature. Actually, I've never used it to make candy, just bread!}

{The eggs are all ready to go!}


Remove {the cottage cheese} from heat and mix in the eggs, honey, and water, taking care that the cottage cheese is not so warm that it cooks the eggs. The final mixture should be 80 degrees F. {I continued to measure the temperature of the mixture until it had gone back down to 80 degrees before combining it with the yeast and dry ingredients (it was a bit hot when I first combined them).}


Dissolve the yeast in warm water. {I forgot to take a picture of this step, but I add the yeast slowly to a teacup filled with the water once the water temp is around 110 degrees F. Again, my thermometer comes in handy!}

Mix the flour, powdered milk, and salt thoroughly...

...making a well in them {the flour, powdered milk, and salt} and adding the liquids. Mix to make a dough, and test the consistency, adding water or flour if needed. The dough should be very soft, and it will be sticky to work with, but if you add too much flour at this stage, the dough will be dry later on and the bread not so high as it should be. {I was hoping I'd be able to use my turquoise bowl throughout the whole process, but it was too small so I switched to my bigger metal bowl.}


{Here's how the dough looked before I started kneading. See the chunks of cottage cheese? I was curious to see what would happen to the dough as I kneaded it.}


For the lightest bread - and this one can be outrageously light - knead very well. Knead at least 15 minutes; then add the butter little by little, and knead again until quite silky. 

{Here's how the dough looked after about 25 minutes of kneading. No more cottage cheese texture here!}


{So smooth!}


Because it contains so many eggs, this dough rises rather slowly. Even so, be careful not to wait too long. When it has risen well, gently poke its center with your wet finger, applying the usual test to see if it is ready to deflate. The dough should not sigh, but is ready as soon as the hole you have made remains without filling in. Press the dough flat... 

{I was going to take a picture of it after it had risen, I let it go 2 hours, but I forgot and started deflating it first. Oops! Using the technique from Laurel's Learning Loaf I gently press the air out from around the sides of the dough. 

And, before I forget, for the rising stage, I use our guest bedroom. It's tiny and has a wall heater that is quite effective. That, combined with a little space heater that has a thermostat allows me to keep the room at an even 80 degrees which is perfect for the rising. I then wrap and cover the bowl of dough loosely in a towel to protect it from drafts when I open the door to come in and check on it.}

...and shape it into a smooth ball. Let it rise again as before. {Usually the second rise is shorter than the first, but since the recipe said, "again as before." I thought it might mean for a full 2 hours. I think I let it go for around 1 hour and 45 minutes. It was huge when it was done rising!} 

{Here it is after the second rise and out of the bowl.}


Divide in two and form smooth rounds. Protect the rounds from drafts, letting them rest until the dough regains its suppleness. 

{If you just want to make bread, this is where you shape it into the loaf and let it do its third rise in an 8"x4" pan before baking at 325 degrees F for about an hour. Let it cool completely before slicing.}

{For Cinnamon Rolls:}

When shaping the bread, roll one loaf's worth into a big rectangle. Brush with softened butter and sprinkle generously with brown sugar and cinnamon - chopped walnuts, too, and a few raisins if you would like. 

{For the first half of the dough, I used water to keep the dough from sticking to the counter and I used my hands to flatten out the dough. It didn't get too big and the dough was still fairly thick when I applied the cinnamon sugar and raisins.}

Roll up jelly-roll fashion, sealing the end well.

{Here's how the dough looked after I rolled it up. As you can see, it was a little lumpy and sticky. 
 
Now, using a loop of strong thread or light cord, cut the roll into slices. 

{I used dental floss. :) It worked very well. This batch just had one big swirl of fillings as you can see in the picture.}

Arrange comfortably close together on a greased baking pan, and let rise in a warm place until very soft. 

{Here they are, all cut up and in the pan. Because I wanted to try getting more swirls into the second batch, I decided to use a different technique for the other half of the dough.}
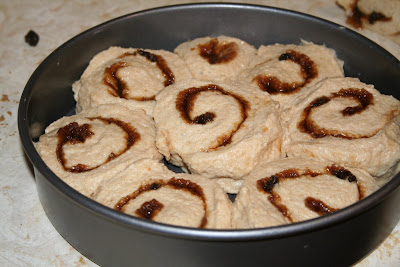
{For the second half of the dough I used flour to keep it from sticking to me or the counter top. I also used my rolling pin to roll it out into a big, thin rectangle of dough.}

{As you can see, it was a lot thinner than the other batch.}

{And it rolled up more tightly and was less gooey on the outside.}

{Now, lets compare the two methods as the rolls look in the pan. Below is a picture of the rolls from the first batch.}


{And here is how the second batch looked when they were all rolled up and in the pan. More traditional, I think, and definitely more swirly.}

{I think I let them rise for about an hour. It was getting late so I didn't keep track of the time as closely as I usually do. Here's how they looked when they got done rising. Both batches got really big!}


Bake along with the bread {If you made half of the dough into bread, I didn't.} (or slightly warmer) until nicely brown - about 20 minutes for smallish, thin rolls, or 40 minutes for big puffy ones. {This should be at 325 degrees F. I let mine cook for about 30 minutes.}

{They looked absolutely gorgeous when they came out of the oven! Here again is a comparison of the two styles of rolling. First, the big, one swirl batch.}

{And then, the more swirly, thinner batch. I think they both came out great, but I think I like the look of the one with more swirls better.}

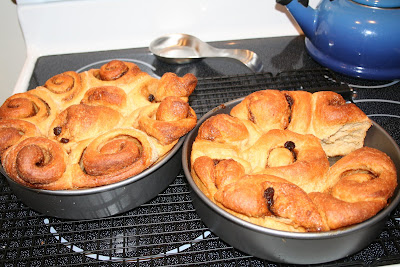
{Side by side comparison.}

{So, all in all, I'd say it was a successful day! I made 4 loaves of bread which so far appear to be quite tasty. Notice that one half loaf is already gone. :) }

{And two lovely pans of cinnamon rolls. It seems like a lot for 2 of us to eat though. I suppose we'll have to give some away. :) It probably wouldn't be good for us to eat them all. However, it would be quite tasty!}
~ElizabethRose