Well, looking back to my previous post, I think I may have been a bit too ambitious when I wrote out my to-do list for today. Of all the things I hoped to do, the only I actually accomplished were baking 4 loaves of bread and practicing counted cross-stitch. The breads I made were the Whole Wheat Learning Loaf and Buttermilk Bread from "The Laurel's Kitchen Bread Book: A Guide to Whole-Grain Breadmaking" by Laurel Robertson(2 loaves each). While I was at it, I decided to go ahead and try the Cinnamon Roll recipe as well, using the Featherpuff Bread. I started baking this morning around 9am and finished up with the last cinnamon roll around 10:30pm. It was a long day but it was definitely worth it.
Below are some pictures from my cinnamon roll making experience along with a little bit of description and the recipe (taken from "Laurel's Kitchen Bread Book.") My notes are in the {}
Don't worry, the cinnamon rolls didn't actually take 11 1/2 hours, I didn't start them until part way through the afternoon when the other loaves were well underway.
Featherpuff Bread {for Cinnamon Rolls}
1 1/2 cups cottage cheese
2 eggs, slightly beaten
1/4 cup honey
1/2 cup water
2 teaspoons active dry yeast
1/2 cup warm water
5 cups whole wheat flour, finely ground
1/2 cup powdered milk
1 1/2 teaspoons salt
2 tablespoons butter, in cold chips
Warm the cottage cheese gently in a saucepan. {I had never thought of putting cottage cheese into bread before! What an interesting idea. I was curious to see how it would come out. Would there be chunks of cottage cheese in the final loaf?}
{As I waited for the cottage cheese to warm up, I got the eggs, water, and honey mixture ready to go.}
{Later in the recipe, it mentioned that the final temperature of the cottage cheese, honey, water, and egg mixture - after they had all been combined - should be 80 degrees F. Armed with that knowledge, I decided to heat the cottage cheese to around 100 degrees F. I used my candy thermometer to keep track of the temperature. Actually, I've never used it to make candy, just bread!}
{The eggs are all ready to go!}
Remove {the cottage cheese} from heat and mix in the eggs, honey, and water, taking care that the cottage cheese is not so warm that it cooks the eggs. The final mixture should be 80 degrees F. {I continued to measure the temperature of the mixture until it had gone back down to 80 degrees before combining it with the yeast and dry ingredients (it was a bit hot when I first combined them).}
Dissolve the yeast in warm water. {I forgot to take a picture of this step, but I add the yeast slowly to a teacup filled with the water once the water temp is around 110 degrees F. Again, my thermometer comes in handy!}
Mix the flour, powdered milk, and salt thoroughly...
...making a well in them {the flour, powdered milk, and salt} and adding the liquids. Mix to make a dough, and test the consistency, adding water or flour if needed. The dough should be very soft, and it will be sticky to work with, but if you add too much flour at this stage, the dough will be dry later on and the bread not so high as it should be. {I was hoping I'd be able to use my turquoise bowl throughout the whole process, but it was too small so I switched to my bigger metal bowl.}
{Here's how the dough looked before I started kneading. See the chunks of cottage cheese? I was curious to see what would happen to the dough as I kneaded it.}
For the lightest bread - and this one can be outrageously light - knead very well. Knead at least 15 minutes; then add the butter little by little, and knead again until quite silky.
{Here's how the dough looked after about 25 minutes of kneading. No more cottage cheese texture here!}
{So smooth!}
Because it contains so many eggs, this dough rises rather slowly. Even so, be careful not to wait too long. When it has risen well, gently poke its center with your wet finger, applying the usual test to see if it is ready to deflate. The dough should not sigh, but is ready as soon as the hole you have made remains without filling in. Press the dough flat...
{I was going to take a picture of it after it had risen, I let it go 2 hours, but I forgot and started deflating it first. Oops! Using the technique from Laurel's Learning Loaf I gently press the air out from around the sides of the dough.
And, before I forget, for the rising stage, I use our guest bedroom. It's tiny and has a wall heater that is quite effective. That, combined with a little space heater that has a thermostat allows me to keep the room at an even 80 degrees which is perfect for the rising. I then wrap and cover the bowl of dough loosely in a towel to protect it from drafts when I open the door to come in and check on it.}
 ...and shape it into a smooth ball. Let it rise again as before. {Usually the second rise is shorter than the first, but since the recipe said, "again as before." I thought it might mean for a full 2 hours. I think I let it go for around 1 hour and 45 minutes. It was huge when it was done rising!}
 Divide in two and form smooth rounds. Protect the rounds from drafts, letting them rest until the dough regains its suppleness.
{If you just want to make bread, this is where you shape it into the loaf and let it do its third rise in an 8"x4" pan before baking at 325 degrees F for about an hour. Let it cool completely before slicing.}
{For Cinnamon Rolls:}
When shaping the bread, roll one loaf's worth into a big rectangle. Brush with softened butter and sprinkle generously with brown sugar and cinnamon - chopped walnuts, too, and a few raisins if you would like.
{For the first half of the dough, I used water to keep the dough from sticking to the counter and I used my hands to flatten out the dough. It didn't get too big and the dough was still fairly thick when I applied the cinnamon sugar and raisins.}
Roll up jelly-roll fashion, sealing the end well.
{Here's how the dough looked after I rolled it up. As you can see, it was a little lumpy and sticky.
{I used dental floss. :) It worked very well. This batch just had one big swirl of fillings as you can see in the picture.}
 Arrange comfortably close together on a greased baking pan, and let rise in a warm place until very soft.
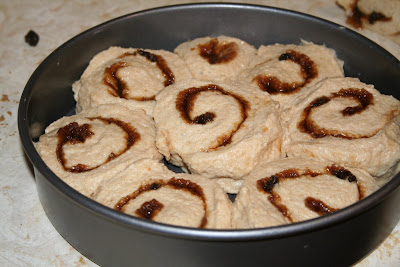
 {Here they are, all cut up and in the pan. Because I wanted to try getting more swirls into the second batch, I decided to use a different technique for the other half of the dough.}
 {For the second half of the dough I used flour to keep it from sticking to me or the counter top. I also used my rolling pin to roll it out into a big, thin rectangle of dough.}
{As you can see, it was a lot thinner than the other batch.}
 {Now, lets compare the two methods as the rolls look in the pan. Below is a picture of the rolls from the first batch.}
{And here is how the second batch looked when they were all rolled up and in the pan. More traditional, I think, and definitely more swirly.}
 {I think I let them rise for about an hour. It was getting late so I didn't keep track of the time as closely as I usually do. Here's how they looked when they got done rising. Both batches got really big!}
 Bake along with the bread {If you made half of the dough into bread, I didn't.} (or slightly warmer) until nicely brown - about 20 minutes for smallish, thin rolls, or 40 minutes for big puffy ones. {This should be at 325 degrees F. I let mine cook for about 30 minutes.}
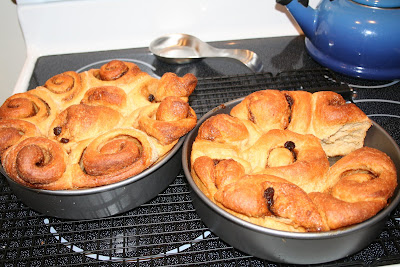
 {They looked absolutely gorgeous when they came out of the oven! Here again is a comparison of the two styles of rolling. First, the big, one swirl batch.}
 {And then, the more swirly, thinner batch. I think they both came out great, but I think I like the look of the one with more swirls better.}
 {So, all in all, I'd say it was a successful day! I made 4 loaves of bread which so far appear to be quite tasty. Notice that one half loaf is already gone. :) }


No comments:
Post a Comment