Tuesday, March 31, 2009

Celery Root and Wild Rice Chowder


This is an absolutely amazing soup! I made it last week and have been looking forward to blogging about it ever since. Unfortunately I didn't have my camera handy when I was mixing it up but I'm sure I'll be making it again before too long so I'll post pictures then. When finished, it seems very sophisticated and is delicious, but it's fairly simple to throw together (or at least it felt simple to me when I was doing it). :) And don't worry, it doesn't really taste very much like celery at all. I personally don't really care much for celery, but I love this soup! Yum! 

The recipe comes from: Local Flavors by Deborah Madison. I would highly highly recommend it for anyone who likes to try out fun new/obscure (and old/traditional) vegetables. It is filled with great recipes using fun ingredients like: sorrel, nettles, lamb's quarters, chicory, kohlrabi, black kale... but there are plenty of recipes that feature only old standbys like tomatoes, corn, broccoli, and eggplant (to name only a few!). 

Celery Root and Wild Rice Chowder 
Serves 4 to 6 
from Local Flavors
by Deborah Madison 

1/2 cup wild rice
1 celery root (about 1 pound)
2 large leeks, white parts only
2 tablespoons unsalted butter
1 celery rib, diced
1 cup thinly sliced russet potato
1/4 cup chopped parsley, plus extra for garnish
1 bay leaf
1 large thyme sprig 
sea salt and freshly ground pepper
2 cups vegetable stock, chicken stock, or water
2 cups half-and-half or milk 
truffle oil, optional 

1. Cover the wild rice with 5 cups water in a small saucepan. Bring to a boil, then lower the heat. Cover and simmer for about 45 minutes, or until tender. 

2. Thickly cut away the celery root skins, then quarter and chop the root into bite-sized pieces. You should have about 3 cups. Chop and wash the leeks. 

3. Melt the butter in a soup pot. Add the vegetables, parsley, bay leaf, thyme, and 1 1/2 teaspoons salt. Cook over medium-high heat for about 5 minutes, then add the stock. Bring to a boil, reduce the heat to low, and simmer for 20 minutes. Add the half-and-half and simmer until the vegetables are tender. Taste for salt and season with pepper. To give the soup a creamy background, puree a cup of the vegetables and return them to the pot. If the soup is too thick, thin it with some of the rice water or additional stock. 

4. Divide the soup among 4 to 6 bowls and then add a mound of the wild rice to each. Garnish each bowl with parsley and add a drop of truffle oil, if using, and serve. 

In my opinion, the final step of topping the soup off with wild rice, parsley, and truffle oil really made it something special. I don't think I would have bothered with the truffle oil at all, but we happened to have some that was given to us as a wedding present so it was really nice to get a chance to use it! Woodley and I both loved the texture of the wild rice and I think I'll be adding it to other chowders that I make in the future. It really gives it a hearty and wholesome flavor that makes the soup seem less rich. 

Lilacs

The lilacs have come out again! On the way up our long driveway there is a beautiful patch of meadow filled with around 10 very old and tall lilac trees. I simply adore lilacs and it is heavenly to walk down the driveway these days! Every time I see their purple blooms it reminds me of the first time Woodley and I drove up our driveway, about a year ago. 

We were just a few months away from our wedding and we had been searching for several months for the perfect house to rent as our first home together. We hoped to find something that felt sort of rural but that was still close enough to the Bay Area for Woodley to commute to work easily. Each day we would pour over Craigslist looking for anything remotely close to what we hoped to find. We looked at a few houses but for one reason or another they weren't quite right. 

Then one day we saw it! An ad for an old farmhouse in Los Gatos with a bit of land and near a public park. I knew the moment I read it that it was the house for us. We first saw the ad about 45 minutes after it was posted and emailed the landlords immediately to arrange to see it. The following afternoon found us driving down to Los Gatos and up the steep windy road that leads to what is now our driveway. As we drove up the driveway for the first time, I looked out the window and immediately fell in love with the patch of blooming lilacs. The house was pretty torn up since it was undergoing a fairly extensive remodel but we knew we wanted it. Later that week everything was finalized and we were thrilled to have found the perfect spot! 

It's hard to believe it's almost a year later. Of course, we didn't actually start living in the house until we got back from our honeymoon in July, but it still feels like we have been here a whole year now. While I was working out in the garden this afternoon I couldn't stop thinking about how grateful I am to be able to live in such a beautiful part of the world! When I was little, I loved spending time outside in our yard and the woods around our house. I think I had forgotten how nice it is just to be outdoors in nature without having to go anywhere or do anything. Just being outside for a long stretch of time listening to the birds singing and feeling the wind blowing gives me such pleasure! With Woodley's help I was even able to finish the other two tops for the planter boxes. Now I just need to figure out where to plant what! 

When I finished in the garden, I picked some lilacs for our dining room table. They are so lovely! I'll have to take a picture of them tomorrow morning after I charge our camera battery. 

~ElizabethRose

Monday, March 30, 2009

A New Vegetable Garden

In my attempt to learn how to garden, I recently bought about 4 books to use as resources as I start out. One of them, "All New Square Foot Gardening" by Mel Bartholomew was highly reviewed on Amazon and seemed to have the easiest system of the books I currently have. Mr. Bartholomew is annoyingly self-absorbed and condescending throughout the text (for example, do we really need a blow by blow recounting of every television program, newspaper, magazine, or radio program that ever asked him to come speak for them?), but his system seemed pretty straightforward and easy to get started so we decided to try it. 

For a "Square Foot Garden" you create 6 inch high planter boxes and fill them with "Mel's Mix" (a combination of compost, peat moss, and vermiculite). You then create a grid of 1x1 foot squares over the box and create a cover to protect your plants from predators. He claims that only 6 inches of soil is needed to grow most vegetables (you have to make a special, taller, box for carrots, parsnips, and potatoes). Since it's a fairly small space, you fill the boxes entirely with his special mix and don't use any of your existing soil which, theoretically, allows for a perfect mix of soil and no pre-existing seeds/weeds. 

Once you have created your boxes and divided them into 1x1 foot squares you can then start planting them - filling each box with a specific number of plants, depending on the space they need to grow. 

I spent some time flipping through the book and made a list of what we would need to build 3 four by four foot boxes, that would allow us 48 one foot squares in which to grow our veggies. Soon we were on our way to several gardening stores and eventually Home Depot to pick up supplies (that was Saturday afternoon).

We picked up some compost and seed packets at the nurseries and got the lumber and hardware we needed at Home Depot. The car was quite packed by the end of our trip!

When we got home, we laid out the lumber and Woodley started screwing the boards for the boxes together with his power drill.

Once he finished with the outer edges of the box, we used a staple gun to tack down a weed barrier cloth over the bottom of the box. That would protect us from new weeds growing up and contaminating our "perfect" mix of soil. 

Here's the finished box covered with the weed barrier. 

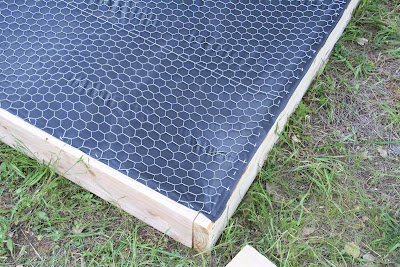
Next, we applied some chicken wire to the bottom of the box, also with the staple gun. Hopefully the chicken wire will protect our delicious veggies from the ravenous ground squirrels that live around here. (We believe one of our previous gardens fell prey to the ground squirrels - each day we would go out to find another plant completely gone! It was like they had a vaporizer gun and could just make the plants completely disappear! I would be very sad if that happened to our garden!)

After we finished stapling the chicken wire down, I cut off the extra with special metal cutting pliers. 

Our first finished box! 

They looked quite nice standing up against the fence. It took us a few hours to finish with all of the boxes and we were quite happy with them when they were done. 

Here is the area we decided to use for our garden. It gets a fair amount of sunshine and there is a good water source for the hose on each end of the field. Also, it's about a 60 second walk from the house and is on the way to the mailbox, so I should go by it every day. Oh! And it is protected from deer by a very tall fence. The trellises are remnants of a bygone era. 

This morning I decided to put together "Mel's Mix" using the ingredients we had picked up on Saturday. Altogether we used: 8 cubic feet of peat moss, 8 cubic feet of vermiculite, and 8 cubic feet of compost (and 1 cubic foot of worm castings). Mr. Bartholomew recommended using a variety of at least 5 different composts. Attempting to follow his directions as closely as possible, we used 3 cubic feet of "Organic Earth Compost," 1 cubic foot of chicken manure, 1 cubic foot of "Steer Manure Blend," 3 cubic feet of Gardner and Bloome's "Soil Building Compost" (made of: "forest humus, chicken manure, worm castings, bat guano, kelp meal, oyster shell lime, and dolmite limes, plus mycorrhizae" - where in the world do they get organic bat guano??), and 1 cubic foot of "Worm-Grow Earthworm Castings." Hopefully it will make a good mix.  

Apparently, some reviewers on Amazon had a hard time finding Vermiculite. At our local Orchard Supply Hardware Store (OSH) they had a small bag that wasn't even 1 cubic foot. Since we needed 8 cubic feet altogether, we kept looking. We found these big 3.7 cubic feet bags at Home Depot. I couldn't tell if it was coarse or medium grade (Mr. Bartholomew recommends coarse grade). Since it was the only Vermiculite to be had easily we went ahead and got it. I think it looks pretty much like the pictures in the book. 

I got a big tarp out and started pouring the different ingredients on. 

I tried to mix it a bit after each new addition using a handy spade I found in the garden. Here's a picture after I added the first bag of vermiculite. 

It took me about and hour to an hour and a half to finish mixing all of the compost, peat moss, and vermiculite together. Here's how it looked when I was finished. 

You can see all of the pieces of vermiculite mixed in with the soil.

While I had been busy mixing up the soil, Woodley had been busy cutting the grass and getting the boxes set up in their final resting places. 

The next step was to shovel in the soil. 

It was pretty fun to see the boxes filling up! 

Two finished boxes, complete with "Mel's Mix."

Later in the afternoon, I came back down to the garden and put together some strips of plastic over one of the boxes to outline the square feet in each box (16 per box). Apparently that is very important for "Square Foot Gardening." Unfortunately, I ran out of tape after one box. 

Next, I decided to make the protective cover for the box. Woodley had put together the bottom of the cover using small 2x1 inch pieces of wood and deck screws. Sadly, his squares of wood didn't stay together very well so I only ended up doing one of the 3 tops. Using the wooden 4 foot x 4 foot square as a guide, I cut pieces of chicken wire that extended roughly 32 inches beyond the edges of the box. I then folded the sides up and attached the edges using zip ties. Creating the cover (I'll do the other two later this week) was the hardest part of the entire process. The chicken wire was incredibly sharp and although I was wearing gloves to protect my hands, they didn't prevent it from flinging back and scratching my arm. I got several deep cuts :( 

However, once I had finished wrestling with the chicken wire and actually got it cut out, bent into shape, and zip tied together, it seemed to work better than I had expected.  

I connected the bottom of the chicken wire box to the wooden frame supports using the staple gun.

So I now have 1 fully completed box with cover and 2 completed boxes that still need their square foot markers and chicken wire tops. I hope to finish those and start planting by the end of the week! Updates are to come! 

~ElizabethRose

Hiking Around the Quicksilver Mines

Last weekend we had the opportunity to go on a fabulous hike with our friends Richard and Tracey. We had a bit of a difficult time figuring out the details as far as where and when to meet, but eventually we got it together and found each other! 

It was a gorgeous day for a hike. It was beautifully sunny out but there was a cool breeze so we didn't get too hot. I had never been to our hiking location before: Almaden Quicksilver Park, but it was a very fun place to visit. 

As the story goes, in 1845 a group from the Mexican military, led by Andres Castillero, met up with some of the Ohlone Indians and they noticed the reddish body paint that the Indians decorated themselves with and traded. As a mining engineer, Castillero recognized that the pigment must be cinnabar, a reddish mineral, made up of a mixture of sulfur and mercury (also known as quicksilver). He asked the Ohlone to take him and his men to the source of their cinnabar and they led him to the area that is now known as New Almaden (it was named after the Almaden quicksilver mines in Spain). 

After discovering the source of the cinnabar ore, Castillero lost no time and quickly filed a claim for the land and started mining. The mines changed hands several times, but by 1865 a thriving community developed around the several mine shafts in the area. The mines were very important to the California gold rush movement because mercury was used to extract gold from the ore collected in the gold mines. In fact, the mercury mines at New Almaden were more lucrative than any California gold mine!

However, over time, as the mines continued to change hands, the mining community dwindled. During the Great Depression, the area was home to a Civilian Conservation Corps project. Later, in the 1960's there was talk of developing the "Cinnabar Hills" into a residential area and in the 1970's a new mine was supposed to be opened, however, both of those plans fell through. In 1976 the County of Santa Clara purchased the property and turned it into a park. For many years there was a museum dedicated to the history of the area, however, perhaps due to the current financial situation, that too has been closed down. 

It is so interesting to hike among the ruins of what was once a thriving community. As we walked along I wondered what it must have looked like in the past and what the previous residents would have though if they could see the land now. 

This building was once a dance hall and later a museum dedicated to the history of New Almaden and the mines. It now stands abandoned. 

We start off on our hike. It was a fairly strenuous uphill climb for about 40 minutes. 

I was glad we were able to go in the spring. The hills were all a brilliant green and the grasses danced in the wind as we hiked along. 

Once we got up a bit higher there were some amazing views of the surrounding hills and the valley below. 

You can just see a bit of the reddish cinnabar showing through in the dirt on the side of the path. 

Here is a better picture of the cinnabar. 

After a few minutes of hiking we passed this closed up mine shaft. Woodley bounded up for a closer view but came back in a hurry when he discovered a little snake in the right hand hole in the cement!

Up at the top of the hill we saw some tumbled down buildings that at one time were houses or stores. Richard remembered them standing the last time he had hiked the trail, about 4 years ago. It was so interesting to think about how nature re-claims the land as time goes by. 

The wildflowers were out in abundance!


Looking down the backside of one of the hills, we had a thrilling view of the valley and other closed up mine shafts. 

This building and its equipment were last used in the 1970's.

I love the spring in California! Beautiful blue skies and brilliantly green grasses!

Just before we started hiking back we came across the most put together building we had yet seen. It looked like it must have been a very charming house set on the side of the hill. Unfortunately now it is completely falling apart, there is poison oak growing out of it, and warnings of hantavirus posted around the outside. We kept our distance! 


It was so fun to be able to both get in a great hike and also visit a bit of history in our neighborhood! If you live in the area and haven't been out to visit New Almaden, I would highly recommend it. :) 

~ElizabethRose

Sheep Attack Part Two

Above is a picture of the cat grass I planted for Leila. It is finally coming up and is doing quite nicely. It took a lot longer to germinate than I had expected, but it is doing very well now and soon I'll be able to bring it inside for her to munch on. 

Last Thursday, Woodley and I decided to once again go for a walk before he left for work. We were a bit nervous about encountering the sheep but I brought my camera with me and we decided to be on the lookout for the sheep. 

As we walked through the first gate, we kept our eyes and ears alert for any sign of the sheep but it was not to be seen or heard. As we were just finishing up with that little stretch of the walk we did see the sheep, but it was way up high on the hill and although it baaed at us several times, it did not appear interested in coming down for a visit. 

So, we continued on our walk. It included a nice view of the California spring hills:

And it seemed as if all the wildflowers were blooming!


When we got back from our walk we noticed that the sheep and come down and was grazing close to the fenced area near our house. I decided to go say hello to the sheep and to try to get some pictures of it. When I first went through the gate he seemed a bit wary but soon he came over to say hello. 

I was just taking this picture:

When he started butting into me. This time while I was facing him. It was a bit unnerving, but I got even more scared as, when I turned around to leave, I felt a strong attack from behind. The sheep was ramming into me with all he had. I bolted for the gate and just barely managed to outrun him. 

From now on, I think I'll stay on the other side of the fence, unless I have a long stick with me to fend him off with. 

He looks so cute and cuddly! It is so sad that he's taken to being aggressive lately. 

We talked to the landlords over the weekend and they helped explain the sheep's odd behavior (and also the absence of the 2nd sheep which we had been wondering about). It turns out that about a week and a half ago a neighbor's dog was running loose and somehow got into the area with the sheep and killed the second sheep. So now, the other sheep is very lonely (since they are social animals) and scared (since it recently saw it's buddy killed by a scary dog, right in front of its eyes!). I don't blame it for being more territorial now. I'm just thankful that Woodley wasn't out doing astronomy when the dog attacked!! What kind of dog is it anyways that could kill a sheep that big or that would want to! I'm definitely going to be more careful when I go out at night and I hope the dog is properly locked up. 

The landlords are looking for a new replacement sheep so that our current sheep won't be so lonely. I hope they find one quickly!

~ElizabethRose

Thursday, March 26, 2009

Growing Herbs and a Special Project Update

Above is one of our "outdoor kitties." They are the neighborhood cats who have lived around our house for several years. There are two of them, a brother and sister and they look almost identical except that the sister is smaller than her brother. Our neighbor calls them "Alpha" and "Beta" but I usually just call them both "gray kitty." It's not a very romantic name, but they don't seem to mind. I try to feed them each day and they seem grateful. They are much more affectionate that I would expect them to be and they love it when I have time to play with them. 

My herb seedlings seem to be doing well. A few days ago I moved them downstairs to a windowsill where they can get more sunlight. Tomorrow Woodley and I plan to go to the garden store to pick up some containers and potting soil so that we can transplant them when they are ready for that. It will be so exciting to be able to pick herbs from our own little garden. I do hope they survive!

I did spend some time working on "the blue room" yesterday. I definitely didn't finish but I did manage to make some progress. It has been a steadily worsening mess ever since Christmas. As I dug through it yesterday (attempting to reconnect with the carpet underneath it all), I realized that it is made up of several things: wrapping paper (Christmas and general), gift wrapping boxes, crafting supplies, and memorabilia from our wedding and celebration ball last year. My goal is to organize the wrapping supplies into two separate groups: one for Christmas wrapping and one for year round wrapping. Then I hope to stumble upon an organizational scheme for the crafting goods and memorabilia. Eventually I want to scrapbook and box up the special items from our wedding adventure. (I will have to blog more about that crazy year-long journey later, probably as I am organizing all those little bits of paper). Once it is all orderly and organized I hope that Thursday can be my crafting day! Currently I have several projects I want to do: a simple skirt, a ballgown I started before Woodley and I even had started dating, and several quilts. 

Well, it's not perfect, but at least you can see a little more floor! 


But for now, I'm off to Zaz's house to watch girly TV shows and learn more about the fine art of cross-stitching! 

~ElizabethRose